
 Roger's Workshop
May 17, 2020
Arched Bridge Construction:
Another approach as update #2, by R.G. Blocks
For April 15, 2020 Update (Click Here)
For May 5, 2020 Update (Click Here)
For June 19, 2020 Update (Click Here)
For December 30,2020 Update (Click Here)
For January 24, 2021 Update (Click Here)
A concrete arch bridge such as the Atlantic Coast Line railroad viaduct-bridge crossing the James River at Richmond, Virginia has always been a fascination. Photograph below credit Wikipedia.
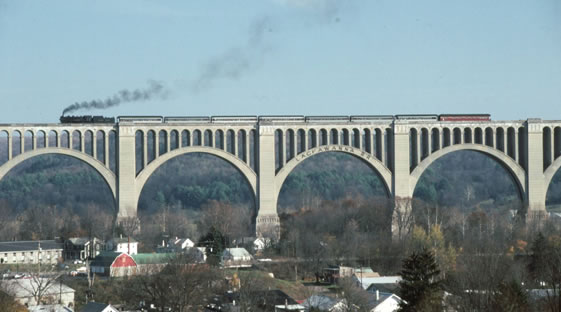
The Tunkhannock Viaduct (better known as the Nicholson Bridge) is a concrete deck arch built in 1915 by the Lackawanna RR, now on the Nicholson Cutoff of the Norfolk Southern RR located at Nicholson, PA crossing Tunkhannock Creek. Photograph below, credit Wikipedia.
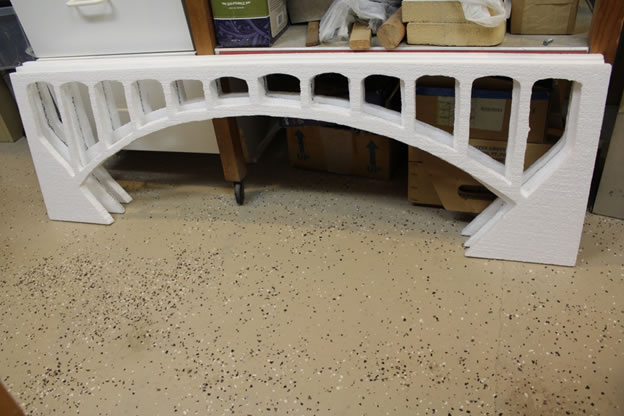
Our attempt at a model of one span (thus a bridge not a viaduct) began with a trip to Menards and purchase of inexpensive white foam material that allowed for three pieces nominally measuring 5/8” x 15” x 48”. Real arch bridges might be composed of two or more parallel concrete arches: ours would have three arches, each 48” in length, each 15” tall and each separated by a ¼” hardwood spacer, and hung from ‘the real bridge’ using a combination of glue and bamboo meat skewers. Below, are our three 48” foam arches.
The ‘real bridge’ in our model is the simulated concrete deck itself. It provides all of the strength to support the O gauge trains. Our bridge deck is composed of two steel inverted ‘U’ shaped shelving wall brackets. Each of the two metal brackets is nominally 0.625” tall x 1.00” wide x 72” long. Each shelf bracket has been partially sawn thru its width and bent 10 degrees horizontally at a point 51” (from one end). Thus, we will have a simulated concrete arch bridge and deck of a 48” in length, supported by Mt Millie on one end and on a pier located at the bend (at nominally 51” down the shelf brackets) followed by a shorter, 10” plate and frame bridge. The reason for the bend in the bridgework was to avoid conflicting with yet another bridge. Thus, the track will have a 10- degree curve (a minor jog) going from one bridge segment to the other. Just like the real mc coy, nothing is quite perfect.
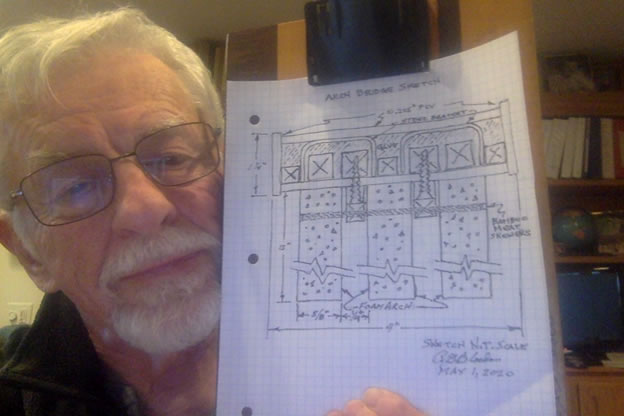
A sketch of the bridge cross-section and its deck-work construction follows:
The three, foam-arch-segments were cut with a hot iron at one time. Hence, any imperfections in cutting are mirrored on all three (a minor consequence of this method). Then, the three foam pieces were painted with flat white water-based house paint. The simulated concrete deck was built out of a good aircraft quality plywood nominally 0.225” thick. The deck sides being tall enough, at 1.25” of the same plywood, to capture the shelf brackets and seven parallel ¼” x ¼” (and larger) hardwood separators and stiffener’s of the shelf brackets (at the cut and 10 degree bend).
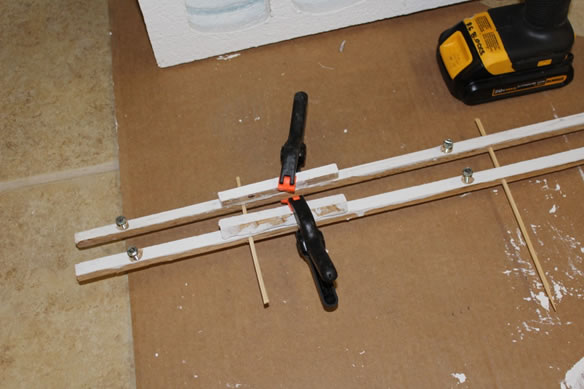
Restated, the composite, simulated concrete deck structure is composed of two steel shelf brackets each of which have two quarter inch hardwood pieces running their length and thus supporting the bracket at the saw cut’s 10-degree bend. Also, three ¼” x ¼”x 48” hardwood stringers, run parallel to the shelf brackets and ‘fill the interior of the simulated concrete deck.
The steel bracket, simulated concrete deck structure deflects very little (negligible deflection) with a 75 lb load being carried by the 48” span. Two steel brackets, seven hardwood spacers, the plywood top and bottom of the deck, and side pieces were all glued as a composite structure using Loctite All Purpose Cement and Elmer’s Wood-Glue in our effort to make a durable rigid bridge.
The next photo shows the simulated concrete deck being assembled. Note the shelf brackets at the near end of the photo will support the 10” plate bridge at a 10-degree angle to the arched bridge. Some of the ¼ inch and somewhat larger hardwood pieces can be seen in the photo (as inside the steel shelf support material). Waxed paper is used to keep the glue dripping composite structure from sticking to the old work table.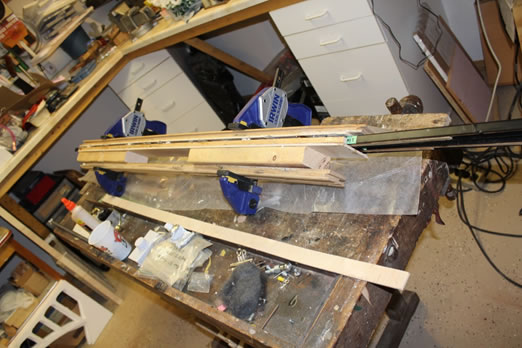
The three foam arches are painted on one side and drying.
Below the deck, there are two spacers for the three foam arches. These spacers are screwed into the deck roughly as shown in the first sketch. Bamboo meat skewers are used to both keep these spacers aligned and will become the supports for the foam arches which literally hang from the simulated concrete deck. Loctite All Purpose Adhesive is used at all interfaces and spacers since it will not damage foam.
A series of photos, from various angles, shows the bridge before surrounding trackwork and scenery are applied. It spans in a N-S direction over tracks of standard O gauge and narrow gauge, On30 heading west from Roger’s park (left photo below). The 10-degree jog allows the northern end of the bridge to clear bridges in the foreground (right photo below).
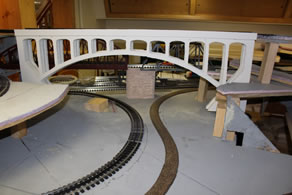
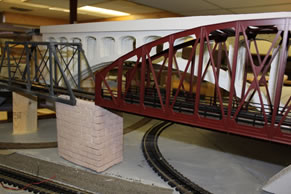
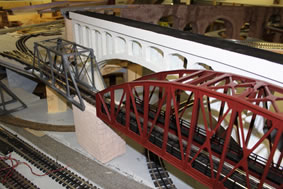
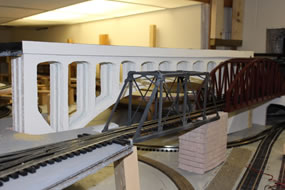
Viewed from slightly above the Roger’s Park Yard area, looking S-W towards what will be Mt Millie, the Arch bridge is yet to have track laid (left above). On the right above, viewed from the East, the arch dominates and complicates the scene (above right).
The concrete arch bridge was a joy to design and construct. It was accomplished while home, avoiding other people, while we did our part to avoid Coronavirus, COVID-19 was wreaking havoc in the real world. We were determined not to become a statistic.
This particular bridge cost a bit less than $25 bucks and kept me occupied for perhaps the better part of a month as I puttered with the necessities of the Mt Anna branch of the TR-C&NW. The railroads shareholders, while not happy with any expenditure have not been appraised of two Warren truss bridges and a wooden trestle that will shortly become reality and yet another major financial burden. I’m told that smoking is far more expensive than model railroading. Really?
Enjoy,
RGB
Join us in the “Greatest Hobby” as a member of the TLMRC.